Friday, July 27, 2012

One Egg Banana Bread...

I'm here today with a yummy and easy recipe!

I think I've mentioned before that I love to cook but my favorite is baking. This is a must try recipe for banana bread. I love it because we always buy way too many bananas that we can't eat before they go bad and this recipe is great for those over ripe bananas that you hate to toss out. It is sooo good! Here is the recipe:

One Egg Banana Bread:

  • 3 lg. bananas, well mashed
  • 1 egg
  • 1 stick of butter, melted
  • 1 1/2 cup sugar
  • 1 teaspoon of salt
  • 1 teaspoon of baking soda

You can also add nuts if you wish. I didn't have any on hand.

Mix all the ingredients in a mixing bowl and then put into a well greased loaf pan. Bake of 350° for about 60 minutes or until a knife inserted in the middle comes out clean.

It can't get much simpler than that. Here is what it looks like after:
Enjoy!


Wednesday, July 25, 2012

90th Birthday...

Yesterday, July 24th, was my grandma's 90th birthday! Isn't that amazing?!? To celebrate her birthday I planned a surprise birthday party at a yummy italian restaurant in downtown Dallas. When we got to the restaurant my grandma was so surprised to see 15 people there excited to celebrate with her. She absolutely loved it! Here are some pictures:
 

I had the day off yesterday, on her actual birthday, so I spent the day with her and took her out to lunch. For lunch she wanted a margarita and boy did she get one... a huge one! I thought it was so cute :)
After lunch we went back to her place and enjoyed the Nothing Bundt Cakes cakes that I brought. If you have not tried these you must! They're amazing! I got the white chocolate raspberry and the marble flavors... I couldn't pick just one :)
My grandma and I are buddies; We've always been really close. She calls me her sidekick and I was so happy I got to spend the day with her. Overall, my grandma had a great birthday! I can't believe she is 90...

Happy Birthday Grandma, I love you so much!


Tuesday, July 17, 2012

I'm in love... with windows!


Yes, I am in love with our new windows. 

Like I stated in my post about our to do list, we had new windows installed. We had all 12 of them replaced. We loved the character of our original windows but they were a pain when it came to opening them. When we first moved in they were actually painted shut. We had to take a knife to them and carefully cut away the paint. But they still didn't open very well; we're talking windows from 1948! And they didn't have screens on them so every time we opened them all the bugs would come in. They didn't look very clean either; there were paint spots all over them.
In our bathroom we had a glass brick window, located in our shower, that I hated! It was very poorly done and was disgusting. We couldn't wait for it to go. 
It was time to invest in some good windows. We went with Window World. We chose them for many reasons but the biggest plus was the lifetime/transferrable warranty they came with. We also liked that they would come out and take exact measurements and would custom make the windows to fit. We found that most place only carry certain sizes and that's all you could choose from. So the guys came out and took the measurements and then we waited about a month until the windows were ready to be installed.

We had some work to do first before they could be installed. Because our bathroom brick window is surrounded by tile we were responsible in removing it. Window World didn't want to be responsible in case the tile broke. But we were happy to do it and we didn't break a tile :) We took a knife and carefully went around the edges and loosened the silicone that was holding the window in. After that we just gave it some good pushes until it fell out. It was pretty easy.
Then it was time for new windows! A team of 3 men showed up around 10am and they were done with all windows around 2pm! We were shocked how fast they were. Here are some shots from the process.
Poor Windows :(
At least they'll be fun for crafts!
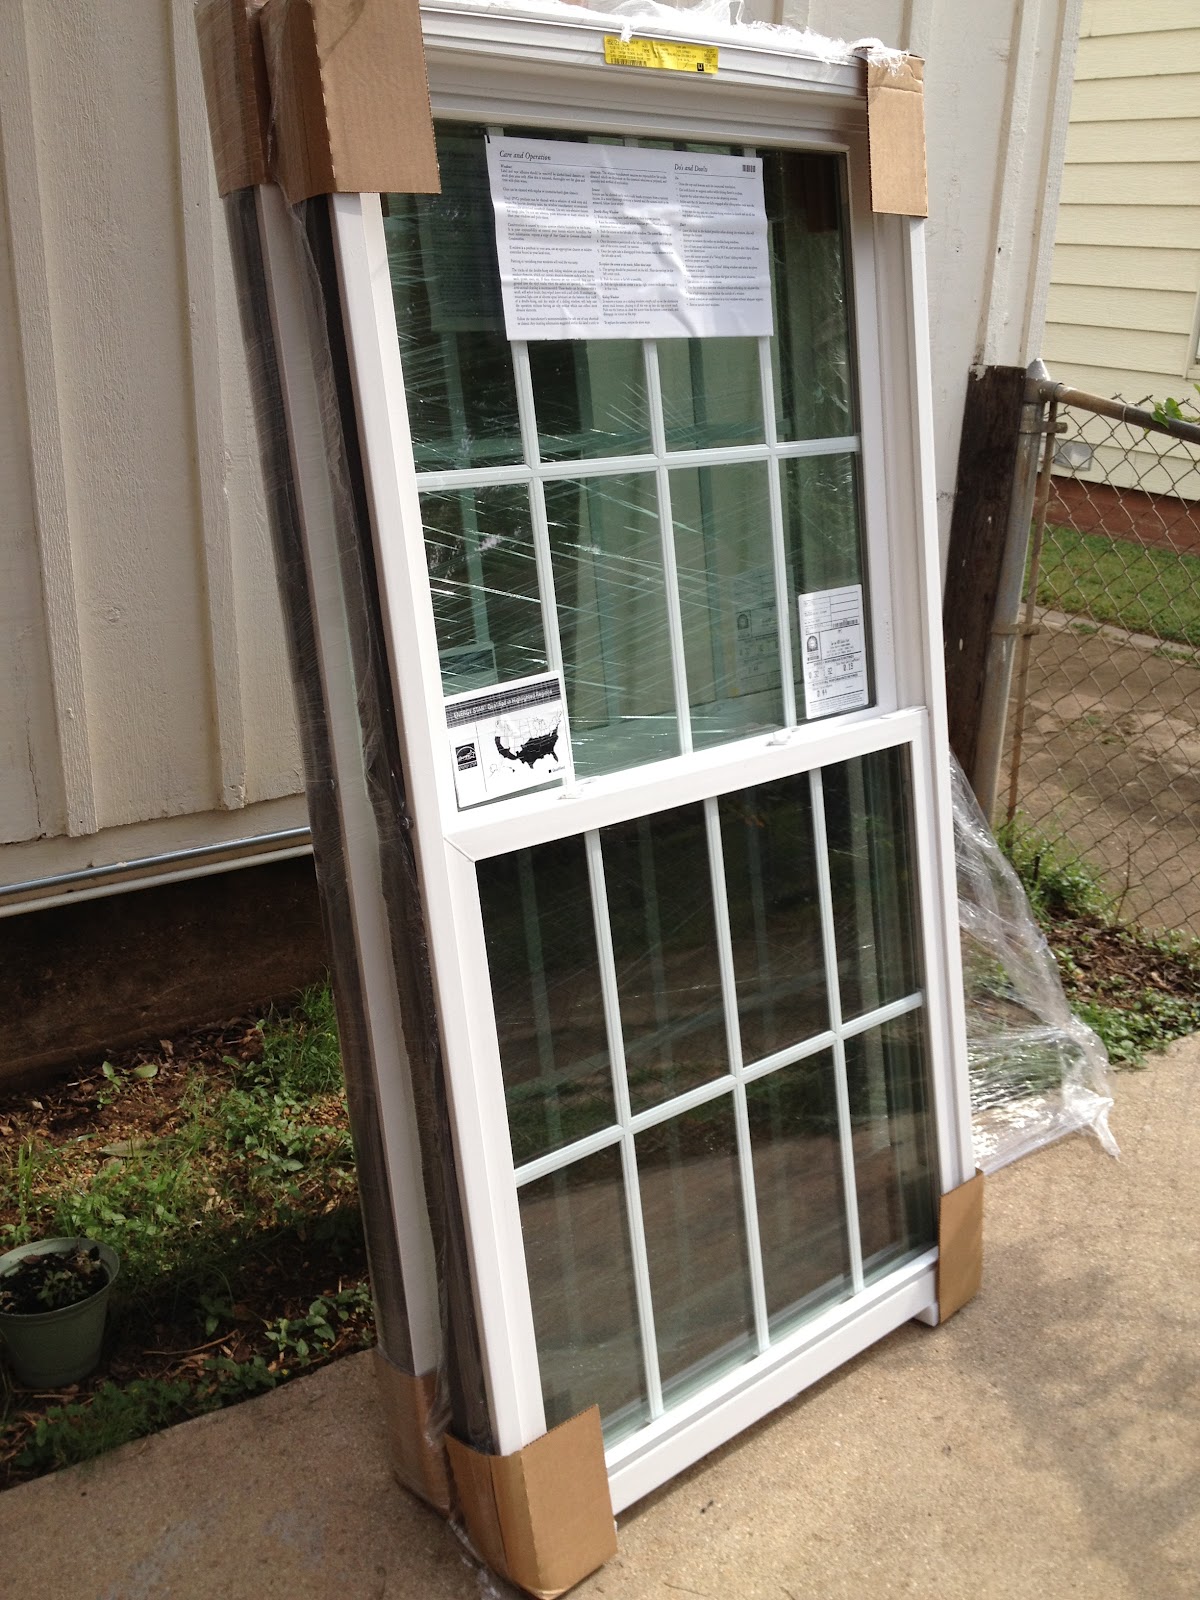
Once they started installing the windows we noticed we had a problem. The new windows had the wrong grid pattern on them! They had too many squares and I said they looked like jailhouse windows:
But we went ahead with the install anyways. The guys came back out 2 weeks later to change the sashes (the grids). They were in and out in less than an hour. We couldn't be happier with them, they look so pretty! Now if the dang weather would cool off so we could open them and really enjoy them!

See how much better the right sashes are?
I don't have a good picture of the bathroom window yet but that's a whole 'nother post itself...
814FA5DAA6F4C53163A911C7748C33D1.png

Monday, July 2, 2012

A Puzzling Puzzle

Who would have thought a bookshelf would be so puzzling?

Let me start from the beginning. One Saturday my mom and I were driving around looking at possible rental houses for my mom. In one neighborhood I saw a lady setting white shelves out in her trash pile. I thought they'd be cool to have but they weren't anything special so I kept driving. But after thinking about them more I decided I had to have them. So I turned back around to take a better look at them. I thought they were OK; they'd be good to use in our garage for some storage. While I was looking at them I noticed to home owner come out so I asked to be sure they were trash and she said of course. So I loaded them up. They looked like this (warning they're not that pretty):
After getting the shelves loaded the home owner asked if I wanted to take a look at some other shelves she had, of course I said yeah! So she took me into her garage and I was in heaven. The shelves were amazing, I mean they were in a million pieces but I could just imagine how they'd look. They're real heavy, thick, real wood bookshelves that are held together with rebar. I loaded the shelves and pieces up and headed home. Once home, Matt looked at me like I was crazy, but I was so happy with my score. But, as life got in the way, they just sat in our garage for a couple months until last week. I decided to try to figure out how they went together, there were no directions. I was outside all day, the temp was 108°, trying to figure them out. It was like a puzzle. After finally figuring them out I realized they were way to big for our room. I wanted to put them in our office. So what did I decide to do? Broke them down and created 2 bookshelves. I'm only using one, for now; the other bookshelf is smaller. Here are some during pictures:
All the pieces spread out on my patio
     

While putting the shelves together I decided I wanted to rearrange the whole room. The curtains I moved in from our guest room into our office. They look much better in there. I love the new room so much more now. Here's a before picture:
And after:


(Sorry some of the pictures aren't great)

I still need to add some better artwork and maybe a rug. It's still in progress but it looks so much better!

Friday, June 29, 2012

Long time no see, I mean blog...

Sorry I've been MIA; there has been a lot going on and we've been a couple of busy bees. I have a lot of house projects to catch y'all up on but first I'll start with our 10 day vacation.

Matt and I just celebrated our 3rd wedding anniversary on June 6th and to celebrate we took a trip, actually kind of 2 trips. I call it a vacation within a vacation. We left on Saturday June 2nd to head to Massachusetts to visit Matt's family up there, some who we hadn't seen since 2009. We stayed at his grandmas house while we were there. For our anniversary, which was that Wednesday, we wanted to get away and do a many trip just the two of us to celebrate. We've each been so busy with our own things it seems like we hadn't had any time to ourselves in a long time. So on Tuesday we rented a car and decided to head to Cape Cod. On our way there we made a 2 stops, one in Salem and one in Boston. Salem is just one of this places you have to see. I want to go back and spend a couple more days there. Then we stopped in Boston (worst traffic ever) but is also a great city. After our stop in Boston we continued on to the Cape. We spent all day Wednesday (our anniversary) exploring Cape Cod and spent a lot of time in Provincetown. Cape Cod is beautiful! It's something you can't see anywhere else. It's definitely a place we can't wait to go back to. Most of our time at Cape Cod involved checking out the many beaches and eating, of course. On Thursday we got up to head back to Matt's grandmas and on our way back we made stops in Plymouth and Providence, Rhode Island. We were exhausted once we got back to his grandmas but our trip within a trip was so fun and much needed. The rest of our vacation was just as fun visiting Matt's family. We even took a trip to Cooperstown, NY with Matt's grandma and uncle, the day after we got back from the Cape; can you say exhausted? Anyways, we went to Cooperstown to visit the Baseball Hall of Fame. It was so cool! The small town is gorgeous and so quaint.

Lets go back to our stop in Providence, RH. Has anyone else been there? I never thought I'd care to go there, it was just in the area (kinda) so we stopped. Little did I know, we fell in LOVE with the city. It was beautiful. I could definitely live there. It's definitely on our list of place to vacation again.

The much needed vacation was so much fun and busy; it's one of those trips where you need a vacation from your vacation. Seriously.


More picture to come later...


Wednesday, March 21, 2012

To Do List...

I am one of those people that has to make lists of what needs to be done or I might go crazy. I make lists for everything; it helps me stay less stressed and organized. Below is a list I've made of projects we want to do to our house. The projects that are highlighted means that we are currently in the process of doing them, and the ones that are marked out  are ones that we've have completed. We don't have a time limit when all of these will be done. They will be done slowly as time and money allows. Heck, some of them may never get done. I'm sure I'm missing something or might even add to it later. I will keep y'all updated on everything!

To Do List
Outside:
  1.  Fix pavers and gravel in front walkway
  2. Add shutters
  3. Build Pergola over patio
  4. Build a small table connected to pergola
  5. Replace windows
  6. Repaint front patio
  7. Repaint stairs on back patio
  8. Add more outdoor seating
  9. Pave second half of driveway and garage
  10. Organize garage
  11. Turn 2nd half of garage into a hobby room

 Living Room/Dining Room:
  1. Paint living room…again (2nd time)
  2. Paint dining room (2nd time)
  3. Stencil one dining room wall
  4. Add Bamboo shades to windows
  5. Get rug for living room
  6. Add new lighting/Ceiling fan in both
  7. Remove half the wall between dining room and kitchen to make it more open
  8. Build floating corner shelves
  9. Get one more end table
  10. Paint coffee table

 Kitchen:
  1. Paint kitchen (2nd time)
  2. Repaint kitchen cabinets
  3. Add kitchen cabinets
  4. Replace all knobs on cabinets
  5. Replace kitchen counters
  6. Replace stove with low profile stainless steel one
  7. Add garbage disposal
  8. Add dishwasher
  9. Add bead board
  10. Add Bamboo shades to windows
  11. Make new curtains
  12. Close in weird side porch off kitchen and extend the kitchen out

 Bathroom:
  1. Paint bathroom (2nd time)
  2. Install fan vent/light
  3. Fix light switch for light above sink
  4. New tile floors
  5. New tile in shower
  6. Take out glass brick window and replace
  7. Get & install new eco toilet from city
  8. Organizing closet in bathroom
  9. Paint the black cabinet and mirror white
  10. Resurface bathtub
  11. Replace old weird tile board with bead board
  12. Install new faucets

 Master Bedroom:
  1. Paint the walls
  2.  Add decorative knobs to dresser 
  3.  Maybe paint dressers?!? 
  4.  Get new bedside tables
  5.  New curtains
  6.  Art work
  7.  Add more storage somehow
  8.  Add a rug

Guest Bedrooms:
  1. Paint guest bedroom
  2. Paint dresser & sewing table
  3. Organize my closets better
  4. Get new bed linens
  5. Add a rug

Office/3rd Bedroom:
  1. Make new curtains
  2. Organize the closet 
  3. Add office storage 
  4. Rug?
  5. Repaint small bookcase
  6. Build window seat

Laundry Room:
  1. Add some artwork 
  2. Organize cabinets better
  3. Paint walls, floor
  4. Replace bead board thats water damaged

 The Whole House:
  1. All new windows
  2. Paint trim and doors
  3. Add crown molding
  4. Refinish wood floors
SO... I guess I better get busy hahaha


Thursday, March 15, 2012

Come see our house!

Just a fun video we put together while getting our home inspection (Summer 2011). None of the decor is ours; it's all the previous owner's. We have made tons of updates since we moved in. I can't wait to share them on this blog!


P.S.- I miss my long hair!!

Monday, March 5, 2012

I am in Heaven!

That's how I feel when shopping at Lowes and Target. Have I ever mentioned that Lowes and Target are my favorite stores? Seriously they are. I can spend hours in both of them and I did just that tonight... A little over 2hrs actually at Lowes. I like to walk down every aisle, including the garden department; It's how I get a lot of my ideas for projects. But anyways, we went a little overboard there tonight. The main reason we went there was to pick up some primer for our cabinets... What we left with was primer, paint, painters tape, rollers, brushes, a bathroom vent fan with a light, the duct work for the vent, possible tile flooring for our bathroom, and a couple misc. items. My first project is to paint our kitchen and bathroom cabinets. They are black right now and I hate them! I've decided to paint them a crisp white to give a feeling of light and openness. The black is just... well black and dark. I can't wait to get started. I will post updates and how to's as I go, including the installation of our bathroom vent fan (that should be interesting lol).

Tuesday, January 17, 2012

I feel like I can do anything. Seriously.

I did it. I stenciled a wall. A whole wall. Now I feel like I can do anything. Seriously. This was the first project I did in our house and I love it!

Let me explain the layout of the room a bit. When you walk in our front door you're immediately in our living room and to your right is our dining room; it's all one open space. When we bought the house the living room and dining room were painted dark red:
(Ignore the mess, this was the night before moving day)
See how dark, depressing, and small it looks? I definitely wanted to lighten the whole room up. So we decided to paint the whole room Olympics' color Secret Passage in eggshell, it's a light gray color. And we decided to do it the night before moving day, we just couldn't wait to get rid of the red. After painting the whole room I definitely knew I wanted to do an accent wall to kind of separate the two rooms. I originally thought to do wallpaper, but after shopping for it we realized it's just too expensive and decided on a stencil wall. First, I will say, I have NEVER stenciled a wall before.  So maybe I was a bit over ambitious…. that seems to be how we roll (literally, haha) here as you will notice the more projects I post. I fell in love with this stencil from Cutting Edge Stencils, I just switched up the colors:
Before I got started I wanted to create more dimension to the wall, so I decided to paint the background a different color and finish. I painted the whole wall with Olympics' Evening Mist in semi-gloss; remember the gray color's finish is eggshell. The background color kind of shimmers and stands out. Once the wall was dry I started the stencil. 

The stencil came with great instructions that I just followed. I first started off by using painters tape to tape off all the edges of walls to keep the lines nice and clean. I started in the bottom center part of my wall because it's kind of hidden in case I screwed up. I then placed pieces of tape around the edges of the stencil to hold it in place. I also used this leveler that just slides on the top of the stencil and keeps everything nice and even, it's a lifesaver!
We used a paint tray with the roller. Roll the roller in the paint a couple times, then roll it on a piece of paper towel to remove the excess paint, very important! Then just start rolling very lightly, don't push hard or the paint will bleed though. Once finished, carefully remove the stencil then place it under or above what you just painted and line up the edges, paint, and just keep repeating the process. The corners and edges were definitely the hardest part. But since the stencil is flexible it's easy to bend, like this:
(pic found here)
Use a small angled brush to paint the edges and corners. Once finished painting, you can remove the tape. There will be some areas that didn't come out perfect and need some fixing, but it's just paint to it's super easy. Just use your small angled brush to do touch ups. Then step back and enjoy your masterpiece! The whole process takes time and lot of patience! Note: your hand may be a little sore by the end of it but it's well worth it). Here are some pictures of the process:

See the difference in the paint finishes?

What do y'all think? Has anyone else done a stencil wall? I'd love to see them!

Related Posts Plugin for WordPress, Blogger...